Few things are as alarming as spotting a fresh scorch or melted patch on a favourite carpet. A dropped cigarette, a knocked-over iron or a hair straightener left on the floor for seconds can leave permanent-looking damage. Yet in many cases, you can restore appearance, protect your deposit in a rental, and avoid the cost and disruption of full replacement by using targeted burn mark repair techniques. Understanding how carpet fibres react to heat, how deep the charring goes, and which repair method fits each situation gives you a realistic chance of saving the carpet and maintaining a safe, attractive home.
Identifying burn marks in carpet: scorch, singe and melt patterns on wool, nylon and polypropylene fibres
Visual inspection techniques to distinguish light scorching from deep pile charring
Removing a burn mark from carpet starts with a careful visual inspection. A light scorch often shows as a slightly darkened or yellowed patch with tips that look singed but still retain some fibre structure. Deep pile charring, by contrast, produces obvious blackened areas, missing tufts and sometimes a visible hollow or crater. Stand back first to check how the discolouration looks in natural and artificial light, then crouch down and examine the individual tufts from different angles. Change the viewing angle as if inspecting paintwork on a car; this makes subtle sheen changes and melted spots on synthetic carpets easier to see.
It helps to think of the carpet surface like grass: a light scorch is like grass that has browned in the sun, while deep charring resembles a patch that has been dug up completely. If the blackened section is only on the very tip of the pile, mechanical trimming and mild stain removal may be enough. Where underlying backing or secondary backing is visible, plug repair, re-tufting or even partial replacement is usually required to achieve an acceptable finish.
Touch and odour tests to assess fibre damage and backing integrity
Once the visual check is complete, a gentle touch test reveals more about the severity of the burn. Lightly run fingertips over the area, comparing the affected patch to a nearby undamaged section. If the carpet feels slightly rough but still flexible, the damage may be limited to surface scorching. A hard, brittle texture that crunches under pressure suggests melted synthetic fibres or carbonised wool that will not respond to normal cleaning. Pressing around the edges also shows whether the backing or underlay has warped, which is critical for larger heat events from irons or heaters.
Odour is another useful clue. Singed wool has a distinctive smell similar to burnt hair, while scorched polypropylene or nylon tends to smell more chemical or plastic-like. If a strong burnt odour lingers even after basic ventilation, deeper thermal damage may have occurred to both pile and backing. In that scenario, attempting aggressive DIY chemical treatments without further assessment risks delamination, shrinking or permanent discolouration that could be more obvious than the original burn mark.
How fibre type (axminster wool, saxony nylon, polypropylene loop) affects repair options
Carpet fibre type significantly alters what is realistically repairable. Axminster wool and other woven wool carpets char and form ash when exposed to heat, but often do not melt. This means small scorch marks can sometimes be reduced by careful trimming and oxidising stain treatments, because there is still a recognisable fibre structure to blend. Saxony nylon and polyester carpets, common in bedrooms and lounges, are more prone to partial melting. Once nylon tufts fuse together, they lose their original twist and bulk, so mechanical retexturing has limits even if discolouration is removed.
Polypropylene loop pile, including many Berber and budget loop carpets, tends to melt and form hard beads at the tips. When that happens, snipping off the bead leaves a visible gap or broken loop, which can travel if mishandled. In those cases, plug repair or re-tufting is often preferable to aggressive trimming. Knowing whether a carpet is a tufted Saxony, woven Axminster or polypropylene loop helps decide whether techniques such as micro-shearing, re-tufting with a latch hook, or full plug replacement are the safest options for a long-lasting result.
When a “burn mark” is actually soot, smoke residue or candle wax contamination
Not every dark patch near a fireplace or candle is a true burn. Soot, smoke residue and candle wax contamination frequently mimic scorch marks but respond far better to cleaning than cutting. If the pile feels normal and flexible to the touch, and there is no hardened or shrunken area, perform a close inspection with a torch to look for surface deposits. Candle wax often appears as a slightly shiny, translucent coating on fibres, while soot particles are dull and dusty. These contaminants can usually be addressed using targeted stain removal, solvent wax removal and hot water extraction before resorting to any irreversible trimming.
Why does this distinction matter so much? A genuine burn has structurally changed the fibre, whereas soot and wax sit on top of the pile. Removing wax or smoke residue incorrectly, for example by scraping loops too aggressively on a Berber carpet, can create damage where none existed. Starting with a pre-cleaning protocol before burn mark treatment is essential to avoid unnecessary fibre loss and preserve the original pile height wherever possible.
Pre-cleaning protocol: dry soil extraction, spot testing and ph control before burn mark treatment
Using HEPA vacuums and crevice tools to remove carbonised debris from the pile
Effective burn mark repair on carpet begins with thorough dry soil extraction. A high-filtration HEPA vacuum with strong suction helps remove loose carbon, ash and brittle fibre fragments from the affected patch. Without this step, later chemical treatments simply push soot deeper into the backing. Fit a crevice tool or narrow upholstery nozzle and work in multiple directions, gently flexing the pile with the tool edge. For loop pile or Berber carpets, use the suction only and avoid dragging the edge sideways across loops, which could cause snagging or runs.
Industry data suggests that up to 80% of soiling in domestic carpets is dry particulate rather than sticky residue. Removing as much of this as possible before adding moisture reduces the risk of muddying, wicking and spreading the apparent size of the burn mark. It also improves the accuracy of damage assessment because the underlying pile and true discolouration become easier to see once loose debris has been extracted from the fibres.
Performing inconspicuous patch tests for colourfastness on patterned and berber carpets
Before using any oxidising or reducing agents on scorch marks, colourfastness testing in an inconspicuous area is non-negotiable. Patterned carpets, Berber designs with flecks, and strong colours can react unpredictably to products such as hydrogen peroxide or sodium metabisulphite. Apply a small amount of the chosen spotter to a hidden section behind a door, under furniture or inside a wardrobe, then blot with a white cloth and observe any dye transfer or fading.
Allow the test patch to dry fully, as some chemical reactions develop over time. If there is visible lightening or bleeding, a different chemistry or a far more conservative approach is needed near the burn mark. Skipping this step can turn a small, contained burn into a much larger pale halo that stands out more than the original damage, particularly on dark Saxony carpets and richly patterned Axminster designs.
Selecting neutral or mildly alkaline carpet spotters compliant with WoolSafe standards
Chemical choice plays a key role in how safely a burn mark can be reduced. For wool and wool-mix carpets, neutral or mildly alkaline spotters that comply with WoolSafe standards help avoid fibre degradation and colour loss. Products with a pH between 5 and 8 are generally considered safer for natural fibres, while more aggressive alkalinity reserved for some synthetic-only installations. If in doubt, assume the carpet contains at least some wool content and choose the gentler option.
Modern carpet cleaning chemistry frequently uses buffered formulations that maintain a stable pH on the fibre, even as they work on scorch staining and smoke residue. Reading product labels and technical data sheets is essential; terms such as oxidising spotter, reducing agent and neutral pH encapsulant indicate different modes of action. Using the wrong chemistry on a delicate Axminster carpet can result in felting, shrinkage or rapid re-soiling, so taking a conservative, standards-compliant route is usually the most cost-effective choice in the long run.
Personal protective equipment (PPE) and ventilation when working with solvents or reducers
Solvent-based wax removers and strong reducing agents like sodium hydrosulphite are effective tools for particular burn-related problems, but they require sensible safety measures. At minimum, disposable nitrile gloves, eye protection and adequate ventilation should be used whenever applying concentrated solutions or working in enclosed spaces. Some products release sulphur dioxide or other pungent gases as they react with scorch marks, and these can be unpleasant or irritating if allowed to accumulate.
Opening windows, using local extraction if available, and limiting contact time with stronger agents keeps both the operator and the carpet safe. Safety data sheets typically provide guidance on recommended PPE for each product. Even for household users, treating carpet in a well-ventilated area and avoiding mixing different chemicals together are straightforward steps that reduce risk while improving the outcome of the burn mark removal process.
Mechanical removal methods: trimming, retexturing and micro-shearing burnt carpet tufts
Using embroidery scissors and duckbill shears to excise singed tips without scalping the backing
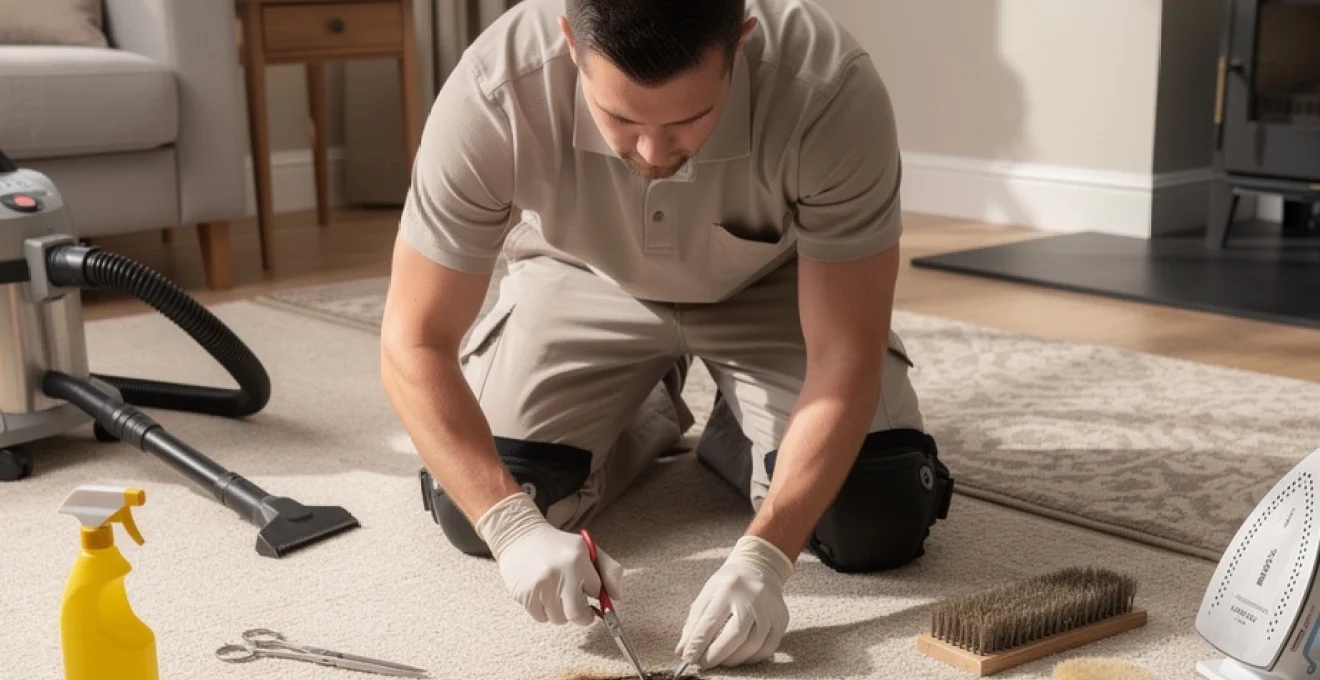
For small burn marks on carpet, mechanical removal is often the least intrusive starting point. Embroidery scissors or fine nail scissors allow precise snipping of individual singed tufts, especially on cut pile and Saxony constructions. Duckbill shears, which have a wide, flat lower blade, help protect the surrounding pile while trimming, acting almost like a built-in guard to prevent accidental gouging into the backing.
Work slowly from the outside of the burnt area inwards, cutting as little as possible at each pass. The objective is to remove the blackened or melted tips while keeping the overall pile height consistent with the surrounding area. If backing threads become visible, trimming has gone too far and the repair will require blending, re-tufting or plug insertion to conceal the exposed substrate.
Levelling the pile with carpet shears, nail scissors and electric fabric shavers
After initial excision of the worst damage, the remaining tufts often need levelling to avoid a noticeable dip. Carpet shears are designed for this task, but in domestic scenarios, sharp nail scissors or an electric fabric shaver can also be used carefully. The technique is similar to giving the carpet a micro “haircut”: skim the surface lightly, removing only protruding fibres, and compare against adjacent undamaged sections every few strokes.
Electric shavers should be used sparingly and tested on a hidden area first, as aggressive use can produce a visibly bald patch. On dense Saxony carpets, small adjustments in pile height are less obvious, while on low-level loop or commercial tiles every millimetre counts. The aim is to restore a uniform surface so that light reflects evenly across the repaired patch, reducing the visual contrast of the original burn mark.
Retexturing cut pile carpets with a grooming rake and pile brush for visual blending
Once trimming is complete, retexturing helps blend the treated area into the rest of the carpet. A grooming rake or stiff pile brush can be drawn through the fibres in multiple directions to lift flattened tufts and redistribute pile. This is particularly effective on plush Saxony and twist pile carpets, where traffic patterns and shading make freshly cut areas more obvious until the fibres are fluffed and realigned.
Short, repeated strokes around the perimeter of the repair help break up any sharp edge where trimmed tufts meet untouched pile. In practice, this step often makes the difference between a repair that remains visible and one that passes a casual inspection. Over a few days of normal use and vacuuming, the retextured spot usually continues to blend, provided the initial trimming respected the surrounding pile height and direction.
Dealing with loop pile and berber carpets to avoid runs, snags and unravelling
Loop pile and Berber carpets present unique challenges because each loop can be connected to others along the row. Cutting a melted bead off a polypropylene loop without care can create a weak point from which the loop starts to pull out, resulting in a run similar to a ladder in nylon tights. To minimise this risk, use very fine, sharp scissors and cut only the damaged segment, supporting the loop with a finger to prevent tension.
Where multiple adjacent loops are affected by burn or melt damage, it is often safer to switch to plug repair or re-tufting rather than extensive trimming. Applying a small amount of latex or seam sealer at the base of cut loops can stabilise the row and stop fraying. This extra step is especially valuable in high-traffic zones such as hallways and stairs, where any weakness in the loop structure is likely to be exposed by daily use.
Chemical and heat-based treatments for light burn discolouration and scorch staining
Applying hydrogen peroxide (3–6%) and sodium percarbonate as oxidising stain removers
Where surface scorching has left yellowing or brown discolouration on light-coloured carpets, oxidising agents can help. Hydrogen peroxide at 3–6% strength is a common choice for removing burn marks on carpet that are more stain than structural damage. Applied sparingly to the affected fibres and gently worked in, it breaks down organic scorch residues and lightens the visible mark. For safety, it should always be spot-tested first and neutralised with a light rinse once the desired improvement is reached.
Sodium percarbonate, often found in “oxygen bleach” powders, releases hydrogen peroxide when mixed with water and can be used in a similar way. The key is controlled application: too much product or prolonged dwell times risk leaving a pale halo, particularly on mid-toned wool carpets. Industry testing over the last few years has shown that carefully managed oxidative treatments can reduce light scorch by 30–60% in many cases, but they cannot rebuild missing or melted fibres, so realistic expectations are essential.
Using reducing agents (sodium metabisulphite, sodium hydrosulphite) on synthetic fibres
Reducing agents take a different chemical approach by adding electrons to break down certain colour bodies, making them useful on some synthetic scorch stains. Products based on sodium metabisulphite or sodium hydrosulphite are often reserved for nylon and polypropylene carpets, where dye systems are more tolerant of this chemistry. Applied under controlled conditions, they can remove or significantly lighten darker scorch marks that oxidisers alone struggle with.
Because these agents can release strong odours and react vigorously, precise dilution and good ventilation are essential. Professional carpet technicians often use them in conjunction with heat transfer methods to target specific fibres rather than saturating the backing. For domestic users considering how to remove a burn mark from carpet with reducing chemistry, seeking advice from a certified cleaner is wise, particularly on mixed-fibre or unknown carpets.
Steam cleaning and hot water extraction with machines like kärcher and rug doctor
After localised chemical treatment, hot water extraction helps flush residues and restore a more uniform appearance. Machines such as domestic Kärcher units or hire systems like Rug Doctor can be used for small areas, provided the operator avoids over-wetting. The combination of heated solution, extraction vacuum and agitation lifts loosened soot, ash and broken-down scorch residues from the pile, allowing the treated zone to blend with the surrounding carpet.
Industry figures indicate that hot water extraction, when properly carried out, can remove up to 90% of water-soluble and particulate soiling, which is why it is frequently recommended after spot treatments. Keeping the burn repair area only slightly more damp than a standard spill clean-up reduces the risk of backing expansion, browning or wick-back stains. A final few passes with plain water help remove any remaining chemical traces, supporting long-term fibre health.
Heat transfer techniques with a steam iron and white terry towel for shallow scorch marks
For very shallow scorch marks on synthetic carpets, carefully controlled heat transfer can sometimes improve the appearance. The principle is simple: a damp white terry towel is placed over the scorch, and a warm (not hot) steam iron is moved lightly over the towel for a few seconds at a time. The combination of heat and moisture helps lift surface residues into the towel and can slightly re-plasticise flattened synthetic fibres, allowing them to be groomed back into shape.
This method must be used with caution. An overheated iron or prolonged contact can deepen the damage and permanently melt the pile. Testing on a hidden area and starting at the lowest effective temperature are essential safeguards. After each short pass, lift the towel to inspect both the towel and carpet. If improvement is visible and no additional distortion is occurring, the process can be repeated a few times before finishing with gentle pile grooming.
Carpet plug repair: cutting out and replacing severely burnt sections with donor pieces
Marking, scoring and cutting a precision plug with a roberts carpet hole cutter
When a burn has penetrated deeply, leaving hard melted tufts or exposing backing, plug repair becomes a practical option. A Roberts carpet hole cutter or similar circular cutter allows a neat, consistent plug to be removed. After identifying the full extent of the damage, the tool is positioned to encompass all affected fibres plus a small margin of sound carpet. A firm, even twist cuts through the pile and primary backing, stopping just short of the underlay.
The removed plug reveals the underlying underlay or subfloor and provides an exact template for the replacement piece. This precision is vital: irregular, hand-cut shapes are harder to align invisibly, especially on patterned or ribbed carpets. By keeping the cut vertical and avoiding frayed edges, the eventual seam between original and replacement fibres is less likely to catch the eye or separate under foot traffic.
Selecting donor carpet from offcuts, wardrobes or under-radiator areas for pile match
The success of a carpet plug repair depends heavily on the choice of donor piece. Ideally, leftover offcuts from the original installation offer a perfect fibre, colour and pile match because they share the same dye lot and wear history. If no offcuts are available, discreet areas such as inside wardrobes, under radiators or beneath permanently placed furniture can provide small donor sections without compromising the room’s overall appearance.
When selecting a donor, pay close attention to pile type and direction. A Saxony piece inserted into a twist pile area, or vice versa, will always look wrong, even if the colour is close. On loop and Berber carpets, matching the exact loop size and pattern fleck is equally important. Turning the donor piece in different directions relative to the burn until the shading and texture match is a simple but powerful technique before cutting.
Bonding the plug with carpet seam tape, latex adhesive or hot-melt glue guns
Once a matching donor plug has been cut using the same tool, bonding it securely into the void is the next step. For small domestic repairs, a thin layer of latex adhesive spread on the underlay and around the edge of the hole provides a flexible, durable bond. In some cases, narrow carpet seam tape or a hot-melt glue gun can be used to stabilise the joint, especially in higher traffic zones where lateral movement is a concern.
The replacement plug should be dropped into place gently and pressed down so that the pile stands level with the surrounding carpet. Excess adhesive must be wiped away immediately to avoid stiff edges. Allowing sufficient curing time before walking on the area is crucial; movement while the bond is still wet can create raised edges or misalignment that are difficult to correct later.
Aligning pile direction, pattern repeat and nap for invisible repair on patterned carpets
Patterned carpets, including many Wilton and Axminster designs, demand extra care in plug alignment. Before committing to adhesive, the donor piece should be rotated until the pattern repeat lines up perfectly with the surrounding design. Even a few millimetres of misalignment in a geometric or floral motif draw the eye straight to the repair, no matter how well the edges are bonded. For plain but heavily shaded carpets, aligning the nap direction has a similar importance.
Running a hand across the donor and original carpet shows the direction in which the pile “lays down”. The plug must be oriented so that the perceived shading matches on all sides. Professional fitters often mark an arrow on the backing before cutting to keep track of pile direction. Taking a few extra minutes at this stage prevents long-term irritation from a patch that stands out every time you enter the room.
Finishing techniques: edge sealing, pile lifting and grooming to disguise the perimeter
After the plug is bonded and aligned, edge sealing and finishing determine how invisible the repair appears. A fine bead of latex or seam sealer around the cut edge helps prevent fraying and fibre loss, effectively locking the interface between old and new carpet. Once cured, gentle pile lifting across the seam with a grooming rake or stiff brush blends the two surfaces and breaks up any straight visual line that might catch light differently.
In the days following the repair, normal vacuuming and foot traffic help settle the plug into place. If any individual tufts remain obviously taller or shorter, careful micro-trimming with fine scissors can even them out. Approached patiently, plug repair can turn what looked like a permanent burn mark into a discreet, structurally sound patch that withstands routine use.
Invisible patching and re-tufting: advanced techniques used by professional carpet fitters
Inserting individual tufts into burnt spots on tufted carpets using a latch hook
For very small burn craters or isolated melted tufts, professional fitters often prefer re-tufting over full plug replacement. Using a latch hook or specialist tuft insertion tool, individual yarn tufts are harvested from a donor piece and anchored into the damaged zone. This method allows precise control over density and direction, often achieving near-invisible results on tufted Saxony and twist carpets.
The process involves pushing the hook through the backing from above, catching the donor yarn loop, and pulling it back through so that both cut ends sit on the pile side. A small amount of latex applied on the backing side locks the new tuft in place once dry. Because only the missing or damaged tufts are replaced, the surrounding pile remains untouched, preserving the carpet’s original structure and feel underfoot.
Latex binding and backing reinforcement for small, deep burn craters
Some burns create small but deep craters that extend into or through the primary backing. In these cases, reinforcing the area before re-tufting is essential to prevent the new yarns pulling out. A patch of lightweight scrim or gauze can be adhered to the back of the damaged area using latex, effectively creating a new backing layer. Once this reinforcement has dried, tufts can be inserted and bonded as normal.
This combination of latex binding and re-tufting is particularly valuable on older carpets where the original backing has become brittle. By strengthening the structure locally, the repair not only improves appearance but also extends the functional life of the surrounding carpet, reducing the likelihood of future splits or frays radiating from the treated area.
Reweaving techniques for high-value woven carpets such as wilton and axminster
High-value woven carpets, including Wilton and Axminster constructions, require an even more specialised approach when damaged by burns. Because the pattern and structure are woven into the body of the carpet rather than tufted into a backing, professional reweaving techniques may be used. This involves replicating the original weave structure with matching yarns, often under magnification and with reference to untouched sections of the same design.
Reweaving is meticulous and time-consuming, but in heritage properties, period homes or commercial spaces with bespoke woven carpets, it can preserve both aesthetic and financial value. Specialist restorers typically carry out a detailed site survey, photograph the damage, and confirm feasibility before beginning work. While costs are higher than basic plug repairs, reweaving offers a solution where replacement would be prohibitively expensive or impossible due to discontinued ranges.
Special scenarios: cigarette burns, hair straightener scorch marks and fireplace ember damage
Step-by-step repair for a single cigarette burn in a rental property bedroom
A single cigarette burn in a bedroom is one of the most common small burn incidents and can be crucial for protecting a rental deposit. The damage is typically a round, darkened spot where the tip made contact. A practical approach often follows these steps:
- Vacuum the area thoroughly to remove loose ash and soot.
- Use fine scissors to snip away the blackened tips, working from the outside in.
- Gently sand the remaining fibres with very fine sandpaper to remove surface charring.
- Apply a mild oxidising spotter (after patch testing) to lighten residual discolouration.
- Blend the area with a grooming brush and, if needed, re-tuft a couple of missing fibres from a hidden donor area.
Handled carefully, this process often reduces a cigarette burn to a barely noticeable blemish, especially in low-traffic areas such as beside a bed, where lighting is softer and viewing distances are greater.
Restoring nylon saxony carpet scorched by GHD or dyson corrale hair straighteners
Modern hair straighteners such as GHD or Dyson Corrale models reach temperatures comfortably above 180°C, enough to melt nylon Saxony fibres within seconds. The resulting damage usually appears as a small, flattened, glossy patch with hardened tips rather than classic black charring. Because the fibres have fused, simple cleaning is ineffective. Instead, controlled trimming, micro-shearing and, in some cases, heat-assisted retexturing are required.
Start by removing the completely melted tips using nail scissors, then assess the depth of remaining damage. If the backing is intact and the affected zone is limited, careful use of a fabric shaver to even the pile, followed by grooming, can significantly improve the look. For deeper or larger scorch marks, plug repair or re-tufting offers a more predictable long-term solution. Given the popularity of straighteners and the frequency of such incidents, some property managers actively brief tenants on using heat-resistant mats to prevent this type of carpet damage.
Repairing ember pitting and melted fibres from open fires and wood-burning stoves
Embers from open fires and wood-burning stoves create a different pattern of damage: multiple tiny pits or melted dots scattered near the hearth. On wool carpets, these may appear as small black or brown specks with a slightly rough texture; on polypropylene or nylon, they can look like pin-prick melted beads. Addressing these effectively depends on the density and distribution of the damage.
Isolated pits can often be corrected with spot re-tufting or very small plug repairs. However, when dozens of tiny burns cover a larger zone, a more strategic choice is required. Sometimes, replacing a hearth-side strip of carpet and installing a larger fire-retardant rug or mat provides a safer, more visually coherent solution. With recent statistics showing a rise in wood-burner installations across the UK, planning for ember protection has become an increasingly important part of carpet selection and maintenance near fireplaces.
When to call a professional: criteria for choosing a carpet repair or cleaning specialist in the UK
Assessing damage severity, subfloor impact and replacement vs repair cost
Not every burn mark is a DIY project. Large, deeply charred areas, multiple melted spots, or any incident involving significant heat (such as portable heaters tipping over) merit professional assessment. A specialist will look not just at the visible pile, but also at underlay condition, subfloor impact and any associated smoke damage. As a rule of thumb, if more than 10–15 cm in diameter is heavily affected, or if the carpet feels stiff and deformed over a wide area, repair complexity and risk of hidden damage increase sharply.
Cost comparisons are also crucial. For lower-value carpets or those near the end of their life cycle, replacement might be more economical than complex reweaving or extensive plug work. On the other hand, in hallways or open-plan spaces, replacing a small section may look worse than a well-executed repair due to colour and wear differences. A transparent quotation that contrasts repair and replacement options, including expected lifespan and visual outcome, helps you choose the most sensible route.
Checking qualifications: NCCA membership, IICRC certification and WoolSafe approval
When selecting a UK carpet repair or cleaning specialist to deal with burn marks, professional qualifications offer reassurance. Membership of bodies such as the NCCA (National Carpet Cleaners Association) and certifications from organisations like the IICRC indicate formal training in fibre identification, stain removal chemistry and repair techniques. For wool-rich carpets, using a technician associated with the WoolSafe programme adds further confidence that products and methods will respect the fibre’s limitations.
Credentials alone are not everything, but they correlate with adherence to recognised standards and access to up-to-date training. In an industry where new fibres, stain treatments and backing technologies continue to emerge, ongoing education makes a tangible difference to repair outcomes, especially for complex burn scenarios involving multiple materials and layered contaminants.
What to expect from a professional burn repair service: site survey, quotation and guarantees
A competent professional burn repair service usually begins with a site survey. The technician inspects the affected area, identifies fibre type and construction, measures the damage, and checks for secondary issues such as odour, smoke residue or underlay scorching. Clear photographs and notes support the assessment. Based on these observations, the provider should outline viable repair options, likely visual results and any constraints, such as residual shading or pattern limitations.
A written quotation, including preparation, labour, materials and aftercare recommendations, allows comparison with alternative providers or replacement costs. Some specialists also offer guarantees or warranties on their work, particularly for plug repairs and re-tufting. While no repair can restore burnt fibres to a truly “as new” state, a transparent process and realistic expectations give you a solid basis for deciding whether professional intervention is justified.
Preventing future burn marks on carpet: fire safety, heat shielding and routine maintenance
Installing fire-retardant mats under irons, hair tools, hookahs and electric heaters
Once a burn mark has been repaired or removed, prevention becomes the priority. Fire-retardant mats or heat-resistant pads placed under ironing boards, hair styling stations and portable heaters create a sacrificial layer between hot objects and the carpet. In homes where hookahs, shisha pipes or similar smoking devices are used, spark-proof trays and mats significantly reduce the risk of dropped embers reaching the pile.
Choosing mats with certified fire-retardant properties and sufficient size to cover the likely fall zone pays dividends over time. A small investment in these protective barriers often costs less than even a basic plug repair, and by absorbing minor accidents, they help maintain both safety and appearance in areas where heat sources are part of daily life.
Choosing BS 5287 flame-retardant carpets and underlays for high-risk rooms
At the specification stage, selecting flame-retardant carpets and underlays for high-risk areas is one of the most effective defences against severe burn damage. Products tested to standards such as BS 5287 are designed to resist ignition and limit flame spread, giving extra time to intervene if a heat source contacts the floor. While no carpet is completely fireproof, those with proven low flammability and self-extinguishing properties tend to produce smaller, more manageable scorch marks instead of extensive charring.
Bedrooms with frequent use of hair tools, living rooms with open fires, and student accommodation with higher smoking risk particularly benefit from such specifications. Combining compliant carpets with appropriate underlays and regular safety checks on appliances creates a layered approach that substantially lowers the likelihood of costly burn repairs.
Household policies for candles, incense and smoking to protect high-traffic areas
Beyond materials and tools, simple household policies significantly influence the frequency and severity of burn incidents. Restricting candles and incense to stable, non-flammable holders placed on hard surfaces rather than directly on carpet is a straightforward example. In multi-occupancy or rental properties, setting clear rules about smoking near soft furnishings reduces the classic scenario of cigarette burns beside sofas, beds and doorways.
Consistent, easy-to-follow rules about where and how heat sources are used prevent more carpet burn marks than any cleaning or repair technique ever could.
Designating specific “safe zones” for activities involving naked flames or very hot appliances keeps high-traffic areas, such as hallways and landings, free from unnecessary risk. Combining these guidelines with awareness of how quickly synthetic fibres can melt when in contact with hot metal tools makes everyone in the household more conscious of their role in protecting shared spaces.
Routine deep cleaning schedule to remove soot, ash and carbon deposits before they set
Finally, routine deep cleaning plays a subtle but meaningful role in managing light scorch and soot-related damage. Regular vacuuming with high-filtration machines, combined with periodic hot water extraction in homes with fireplaces, wood burners or heavy candle use, removes fine ash and carbon particles before they bond permanently to fibres. Over time, these particles can darken traffic lanes and make minor scorch marks harder to distinguish and treat.
Think of scheduled carpet maintenance like servicing a boiler: invisible build-up is removed before it turns into a visible or structural problem.
Adopting an annual or bi-annual deep cleaning schedule, adjusted for usage and environmental factors, keeps pile open, colours brighter and fibres more responsive to spot treatments when inevitable minor accidents occur. As a result, when a burn mark does appear, the underlying carpet is in a better condition to accept precise, minimally invasive repair, preserving both comfort and visual appeal across the home.